Introduction
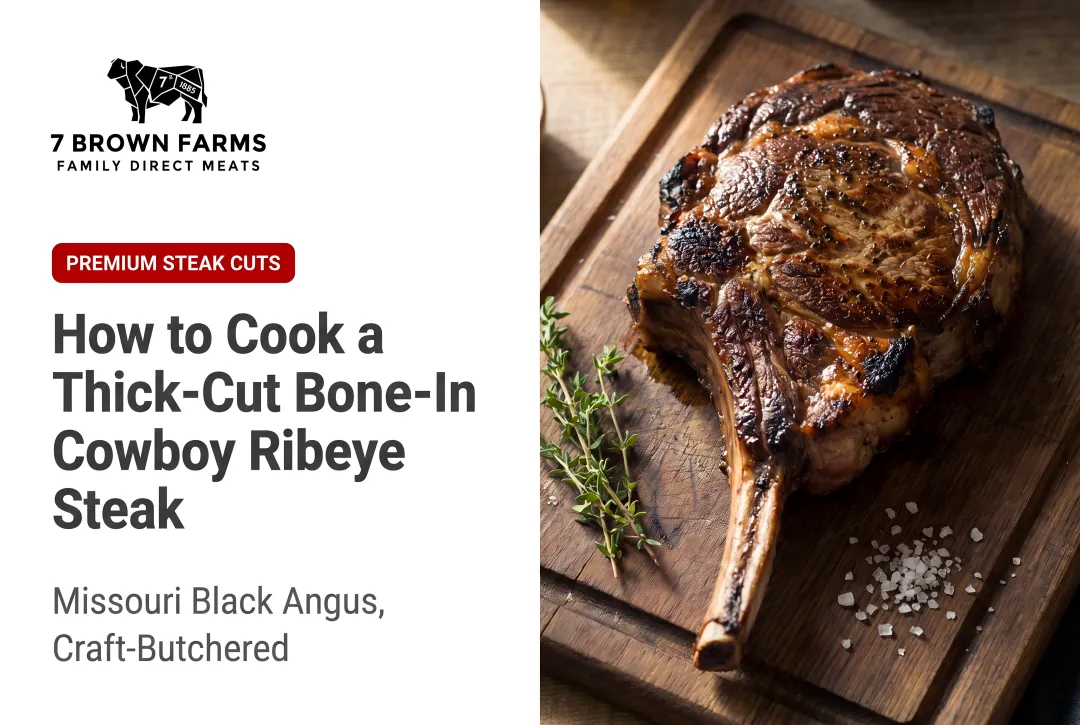
The cowboy ribeye is one of the most rewarding, and unforgiving, cuts to cook at home. At 1.5–2.5 inches thick with a frenched bone attached, it's built to impress. But its bulk creates a problem: standard high-heat methods produce a charred exterior with a cold, raw center or an overcooked gray band surrounding a barely medium-rare core.
The reverse sear method solves this. The difference between a ruined expensive cut and edge-to-edge medium-rare comes down to prep, temperature control, and execution. Miss any one of them, and the result shows. Nail all three, and you'll pull a steakhouse-quality crust off your own grill.
What follows is the complete process — gear, exact temperatures, timing, and the small variables that most home cooks overlook.
Key Takeaways
- Reverse sear: low-and-slow oven at 225–250°F first, then finish with high heat for the crust
- Cowboy ribeyes must be at least 1.5 inches thick for this method to work — thinner cuts cook through too fast
- An instant-read thermometer is non-negotiable — pull at 10–15°F below your target doneness
- Dry-brine uncovered in the fridge overnight for a better crust
- Quality matters — a well-marbled, properly dry-aged cut is as important as technique
What You Need Before You Start
Preparation directly determines the quality of the final result. Skip the dry brine or rush the resting phase and you'll trade a perfect crust for a steamed, uneven cook.
Choosing the Right Cowboy Ribeye
Look for a bone-in ribeye cut 1.5–2.5 inches thick with marbling distributed throughout — not just at the edges. Marbling drives flavor and moisture during the low-and-slow phase. The intramuscular fat acts as lubrication during cooking and accounts for up to 21% of consumer-rated tenderness, juiciness, and flavor.
7 Brown Farms' Ozark Black Angus cowboy ribeyes are consistently marbled and go through a minimum 14-day dry-aging process using Italian-certified Stagionello cabinets, which use University of Florence methods to control pH stabilization and moisture loss during curing. Dry-aged cuts arrive with a naturally drier surface. That moisture loss accelerates Maillard browning during the sear, giving you a deeper, faster crust.
Equipment Checklist
You'll need:
- Instant-read or probe thermometer (critical — no guessing)
- Oven, pellet smoker, or gas grill capable of holding 225–250°F
- Cast iron skillet or grill grate for the final sear
- Wire rack over a rimmed baking sheet (for oven method and dry brining)
- Paper towels and kosher salt
How to Reverse Sear a Cowboy Ribeye Steak, Step by Step
Step 1: Season and Dry Brine
Pat the steak completely dry on all sides with paper towels, then coat generously with kosher salt (and freshly cracked black pepper or a simple steak seasoning) on all surfaces, including the fat cap and bone side.
Place uncovered on a wire rack in the fridge for a minimum of 1 hour — overnight produces visibly better browning. The salt draws out surface moisture through osmosis, then reabsorbs back into the meat, seasoning it deeper and drying the exterior for a superior crust.
Cold fridge air evaporates remaining surface moisture, leaving a dry pellicle that browns quickly and evenly under high heat.
Step 2: Bring to Room Temperature
Remove the steak from the refrigerator 45–60 minutes before cooking. A cold center extends low-phase cooking time unevenly and increases the risk of a gray band near the surface. The goal is a more uniform starting temperature before it enters the oven or grill.
Step 3: Low-and-Slow Phase
Preheat your smoker, grill (indirect heat zone), or oven to 225–250°F. Place the steak on a wire rack or directly on the grill grate over indirect heat.
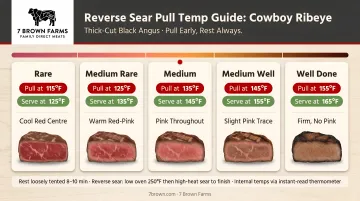
Cook until the internal temperature reaches 10–15°F below your target doneness. That buffer exists because the final sear will add the remaining heat.
Doneness Temperature Reference:
- Rare: Pull at 105°F (finish ~120°F)
- Medium-rare: Pull at 115°F (finish ~130–135°F)
- Medium: Pull at 125°F (finish ~140°F)
Use a probe thermometer to monitor without opening the cooker repeatedly. Check temperature at the thickest part of the meat, avoiding contact with the bone — bone conducts heat differently than muscle tissue and will give false readings.
Step 4: The First Rest
Remove the steak and rest it on the rack for 8–10 minutes. During this time, crank the grill or heat a cast iron skillet over the highest heat possible.
This rest allows surface moisture that migrated outward during cooking to reabsorb slightly, and it stabilizes the internal temperature so the sear doesn't push the center over target. Pat the surface dry again with paper towels immediately before searing — this step directly determines crust quality.
Step 5: The High-Heat Sear
Sear the steak on the ripping-hot grill grate or cast iron for 1–2 minutes per side. Going longer than that risks overcooking the interior. Use tongs to press the fat cap edge directly against the heat to render and brown it.
The Maillard reaction — the chemical browning that creates crust flavor — requires surface temperatures above 300°F. Get the surface screaming hot, then move fast. Add butter or herb compound butter to the cast iron during the sear for extra browning and flavor.
Step 6: Final Rest and Serve
Rest the finished steak for a final 5–10 minutes before slicing. The final rest can be shorter than with traditional sear-first methods because the low-and-slow phase already distributed heat evenly — the main job here is juice redistribution before slicing.
Slice across the grain in 1–2 inch cuts, perpendicular to the bone, and finish with flaky salt and optional herb butter or chimichurri.
Key Parameters That Affect Results
The reverse sear is forgiving by design, but four variables determine whether the result is merely good or exceptional.
Steak Thickness
Cuts thinner than 1.5 inches reach target internal temperature too quickly during the low phase, leaving no time for even heat distribution or surface drying. Cuts 1.5–2.5 inches thick produce the widest edge-to-edge medium-rare zone with the least gray band — which is why quality sources cut cowboy ribeyes to this spec by default.
Low-Phase Temperature Setting
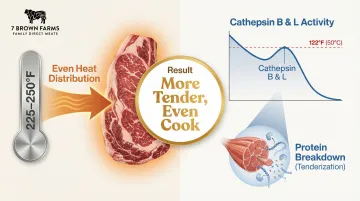
Cooking between 225–250°F slows heat transfer, giving the interior time to equalize before the exterior overcooks. Higher temperatures speed cooking but shrink the window of precision.
The slower pace also extends the window for cathepsin enzymes (B and L) to break down tough muscle proteins — a tenderization effect that mimics dry aging. These enzymes remain active and heat-stable up to 122°F (50°C), effectively warm-aging the steak before they denature. It's a key reason reverse-seared steaks often taste more tender than even high-quality pan-seared versions.
Internal Temperature at Pull
Pulling too late — at or above your target — leaves no room for the sear to add the final 10–15°F. The result is an overcooked interior regardless of a perfect crust.
For medium-rare (target 130–135°F), pull at 115°F and let the sear carry the rest. Bone-in cuts like the cowboy ribeye conduct heat slightly differently near the bone, so always check temperature at the thickest part away from it. Get that pull temperature right, and the sear becomes the finishing touch rather than a liability.
Sear Heat Level
Insufficient sear heat extends contact time, pushing the interior over target while the crust stays pale. The colder and drier the surface enters the pan, the more efficiently a short, high-heat sear will brown it.
A properly preheated cast iron or grill grate should produce an audible sear on contact. Preheat cast iron for at least 3–4 minutes over high heat, then add a small amount of high smoke-point oil just before the steak — enough to prevent sticking without cooling the surface.
Common Mistakes When Reverse Searing a Cowboy Ribeye
Most reverse sear failures come down to the same four mistakes. Avoid these and you'll hit a great result almost every time.
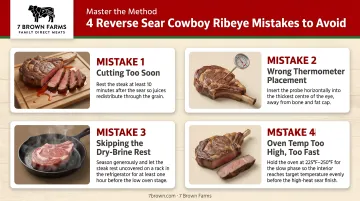
Not patting the steak dry before the sear. Surface moisture is the enemy of crust formation. Even a properly brined steak will steam rather than brown if it goes into the pan wet. Pat dry immediately before the sear phase — not just before the low phase.
Using time instead of temperature. Thickness, starting temp, and equipment all affect how fast a steak cooks. Without a thermometer, you're cooking blind. Pulling too early (below 105°F) means the center won't finish properly during the sear.
Searing on a pan or grill that isn't hot enough. Medium-hot surfaces gray the exterior rather than sear it. The Maillard reaction needs surface temperatures above 300°F. On a grill, run all burners at maximum for at least 5 minutes before the sear — lid closed.
Skipping the rest between phases. Going straight from the oven to the sear traps the moisture that migrated to the surface during the low phase. An 8–10 minute rest (plus a second pat-dry) puts the surface in ideal condition for fast, even browning. Skip it and you'll get a softer, less defined crust.
Should You Reverse Sear a Cowboy Ribeye?
Yes — and the cowboy ribeye is one of the best candidates for this method precisely because of its thickness. The bone-in structure also helps retain moisture during the extended low phase. Reverse searing is the recommended method for cowboy ribeyes over 1.5 inches thick because it eliminates the gray overcooked band that high-heat-first methods produce on thick cuts.
Situations where reverse searing isn't the right call:
- Cuts thinner than 1 inch
- When time is limited (the method takes 45–75 minutes total versus 15 minutes for a pan sear)
- When a fond-based pan sauce is desired (reverse searing produces little to no fond)
For those scenarios, a hot cast iron butter-basted sear or traditional grilling is more practical.
No smoker or grill? Set your oven to 250°F, place the steak on a wire rack, and cook to your pull temp — then finish with a screaming-hot cast iron skillet sear on the stovetop. The results are nearly identical, and it's how most home cooks will run this method.
Frequently Asked Questions
Should you reverse sear a cowboy ribeye?
Absolutely. The reverse sear is the right method for bone-in ribeyes at 1.5+ inches thick — it ensures even doneness edge-to-edge and builds a superior crust compared to sear-first methods on thick cuts.
What is the 3-3-3 rule for steaks?
The 3-3-3 rule (3 minutes each side over high heat, then 3 minutes rest) applies to standard-thickness steaks cooked with traditional high-heat methods — not to thick cowboy ribeyes, where the reverse sear method is far more reliable.
Can you reverse sear a cowboy ribeye in the oven instead of a smoker?
Yes. Preheat your oven to 225–250°F, place the steak on a wire rack over a baking sheet, and cook to your pull temperature. Finish with a cast iron skillet sear on the stovetop for the crust.
What internal temperature should a cowboy ribeye reach for medium-rare?
Pull from the low-heat phase at 115°F, then sear to finish at 130–135°F. Check temperature at the thickest point away from the bone.
How long does it take to reverse sear a cowboy ribeye?
The low-and-slow phase takes approximately 45–75 minutes depending on steak thickness and oven/grill temperature, plus a 10-minute rest and a 4–6 minute sear — roughly 1 to 1.5 hours start to finish.
Do you need to rest a reverse-seared steak after the sear?
Yes, but only briefly. Five to 10 minutes is enough — the low-and-slow phase already evened out the internal temperature, so the post-sear rest is shorter than with traditional high-heat methods.