Introduction
Few cuts punch above their weight like tri-tip. Sometimes called "triangle steak" or "Santa Maria steak," this 1.5–3 lb bottom sirloin roast has deep roots in California barbecue culture — popularized in the 1950s by Santa Maria butcher Bob Schutz — and it's still one of the most flavorful, affordable cuts you can throw on a grill.
It looks simple enough to grill, but results vary dramatically. Sear-first versus reverse-sear approaches, temperature control, and slicing technique all determine whether you pull off a juicy, tender roast or end up with something dry and chewy.
Meat quality matters too. A well-marbled, properly aged tri-tip — like 7 Brown Farms' 100% American Black Angus, dry-aged 14 days minimum — holds moisture better and delivers noticeably richer flavor than commodity beef.
This guide walks through exactly what you need, the step-by-step grilling process, the key variables that make or break your results, common mistakes to avoid, and when alternative cooking methods might serve you better.
Key Takeaways
- Tri-tip is a 1.5–3 lb triangular bottom sirloin roast best grilled over two-zone heat: indirect first, then a direct sear
- Target 130–135°F internal temperature for medium rare using a meat thermometer—never rely on time alone
- Rest the meat for at least 10 minutes before slicing to retain juices
- Tri-tip runs in two grain directions: halve the roast at the grain change, then slice each section against its own grain
- Meat quality matters: superior marbling translates directly to juicier, more flavorful results
What You Need Before Grilling Tri-Tip
Prep decisions—fat trimming, seasoning timing, and gear selection—directly shape your finished result and are steps home cooks rushing to fire up the grill skip too often.
Equipment and Setup
Essential tools include:
- Two-burner gas grill or charcoal grill capable of creating distinct heat zones
- Instant-read or probe meat thermometer (essential for hitting safe pull temperatures)
- Long-handled tongs for safe handling over high heat
- Cutting board and sharp slicing knife for proper grain-cutting technique
- Basting brush or sauce mop (optional, for mopping liquids)
Grill setup varies by type. Gas grills create zones by turning on one side only. Charcoal grills require banking coals to one side. Ceramic kamado grills use a heat deflector for indirect cooking.
Choosing and Prepping the Cut
Look for these quality markers when selecting tri-tip:
- Good intramuscular marbling—fat streaked throughout the muscle, not just a thick exterior cap
- Weight of 2–3 lbs for optimal cooking control
- USDA Choice or Prime grade whenever possible
Research shows that USDA quality grades directly impact consumer satisfaction, with Choice and Prime significantly outperforming Select for tenderness and juiciness.
A well-marbled, 14-day dry-aged tri-tip—like the American Black Angus cuts from 7 Brown Farms—delivers richer flavor and better moisture retention than commodity beef. Intramuscular fat acts as built-in insurance against drying out during high-heat cooking.
If a thick fat cap is present, trim it down to about ¼ inch. Leaving a thin layer allows it to render and baste the meat during cooking. Removing it entirely leads to faster moisture loss.
How to Grill Tri-Tip Steak: Step-by-Step
This guide uses the indirect-first method (also called a modified reverse sear), which gives more control over doneness and produces a better crust than searing first for larger roasts.
Step 1: Season the Tri-Tip
Season generously on all sides with a dry rub at least 30 minutes before grilling. The classic SPG base is:
- Equal parts kosher salt, coarse black pepper, and garlic powder
- Optional additions: paprika, smoked paprika, onion powder, cayenne
Pro tip: Let the seasoned tri-tip sit uncovered in the refrigerator overnight to allow salt penetration deeper into the muscle. Pull from the fridge 30–45 minutes before grilling to take the chill off and promote even cooking.
Step 2: Preheat and Set Up Two-Zone Heat
- Preheat the grill to approximately 350°F for indirect cooking
- Set up a hot zone (direct heat) and a cooler zone (no direct flame or coals beneath)
- Confirm that grill grates in the indirect zone are clean and lightly oiled to prevent sticking
The goal is consistent, moderate temperature in the indirect zone—not high heat.
Step 3: Cook Over Indirect Heat
- Place the seasoned tri-tip on the indirect zone, fat-side up if the fat cap is present
- Close the lid and grill for 30–45 minutes, flipping every 6–7 minutes
- Optional: Brush with a mopping liquid (olive oil, red wine, crushed garlic) after each flip
- Monitor internal temperature with a probe thermometer
- Pull the roast off indirect heat when it reaches 10°F below target ((for example, pull at 120–125°F for a medium rare target of 135°F))
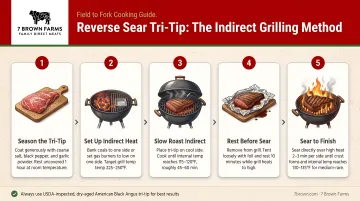
Step 4: Sear Over Direct Heat
Move the tri-tip to the direct high-heat zone and sear each side for 2–3 minutes until a deep, golden-brown crust forms. This is the Maillard reaction: the chemical process responsible for smoky, charred exterior flavor.
Don't skip the edges — use tongs to hold the roast on its thinner sides and sear those surfaces too. Pull from the grill when internal temp reaches your target doneness (see temperature chart below).
Step 5: Rest the Meat
Remove the tri-tip from the grill and rest on a cutting board for 10–15 minutes uncovered. Research from America's Test Kitchen shows that rested roasts lose 60% less juice than those sliced immediately. Muscle fibers relax and reabsorb moisture during this window, keeping each slice juicy rather than bleeding out onto the board.
Step 6: Slice Against the Grain (Both Directions)
Tri-tip presents a unique dual-grain challenge: it's made of two muscles whose fibers run in nearly perpendicular directions. Slicing without accounting for this makes the meat tough regardless of how well it was cooked.
Proper technique:
- Find the point where the grain direction changes (usually visible as a seam roughly two-thirds from the pointed end)
- Make one cut down that line to divide the roast into two sections
- Slice each section thinly (¼ inch) across its own grain
Aim for ¼-inch slices — thin enough that the short fiber length does the work, making even a well-done edge tender on the bite.
Key Variables That Affect Your Results
Execution matters, but so does what you're working with. These five variables determine whether your tri-tip lands perfectly cooked or ends up dry, tough, and forgettable.
Marbling and Meat Quality
Intramuscular fat keeps meat moist and flavorful during high-heat grilling. Heavily marbled cuts have built-in insurance against overcooking, while lean cuts with poor marbling punish any temperature overshoot with dryness.
Research shows that intramuscular fat percentage accounts for 17–21% of the variation in consumer palatability scores for tenderness, juiciness, and flavor. Premium Black Angus or 14-day dry-aged beef delivers superior moisture retention and richer, nutty flavor notes compared to commodity Select-grade beef. 7 Brown Farms' American Black Angus tri-tip — dry-aged 14 days and custom grain-finished in the Missouri Ozarks — holds moisture through the reverse-sear process in a way that Select-grade cuts simply can't match.
Grill Temperature Consistency
Inconsistent heat—caused by flare-ups, wind, or uneven burner output—leads to uneven cooking where the exterior burns before the interior reaches safe temperature. Monitor your grill thermometer and adjust vents or burners to hold steady heat in the indirect zone throughout the cooking process.
Internal Temperature Targets
| Doneness Level | Pull Temperature | Final Temperature After Rest |
|---|---|---|
| Rare | 115°F | 125°F |
| Medium Rare (recommended) | 125°F | 135°F |
| Medium | 135°F | 145°F |
| Medium Well | 145°F | 155°F |
| Well Done | 150°F | 160°F |
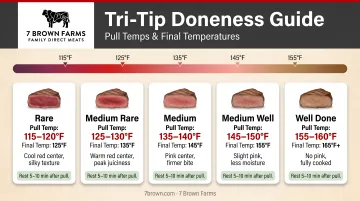
Pull temperatures assume a 10–15 minute rest. Skip the thermometer and you're guessing — tri-tip's irregular shape means surface color is unreliable. Medium rare (135°F final) keeps the muscle fibers tender and the juices intact; past 145°F, the cut tightens noticeably.
Resting Time
Muscle fibers contract during cooking and push juices toward the center. Resting allows the fibers to relax and reabsorb those juices. A minimum of 10 minutes is required; 15 minutes is better for a 2–3 lb roast.
Slicing Technique
Even a perfectly cooked tri-tip will seem tough and chewy if sliced with the grain rather than against it. The dual-grain structure is unique to this cut and is the single most commonly missed step among home cooks. Always inspect the grain direction before making your first cut.
Common Mistakes When Grilling Tri-Tip
Most tri-tip problems trace back to three consistent errors. Avoid these and you'll get a better result almost every time:
- Skip the thermometer and you're guessing. Tri-tip's uneven thickness means the narrow end can be well-done while the thick center is still rare — a meat thermometer is the only reliable way to pull it at the right moment.
- Cut too soon and the juices run straight onto the cutting board. Even a 5-minute rest helps, but 10–15 minutes is the standard for keeping that moisture in the meat where it belongs.
- Slice with the grain — or miss the grain shift — and even a perfectly cooked roast turns chewy and stringy. Tri-tip's grain runs in two directions; always inspect before the first cut and adjust midway through.
Alternatives to Grilling Tri-Tip
Grilling is the most popular method but not always the right one. Other methods can deliver excellent results depending on equipment, weather, and desired flavor profile. Three alternatives stand out depending on your setup and goals.
Smoking Tri-Tip
Choose smoking when you want deeper smoke penetration, a pronounced smoke ring, and a more hands-off cook. It's the natural choice for weekend sessions when time isn't a constraint.
Smoke tri-tip at 225–250°F over wood until the internal temperature hits 130–135°F — typically 1.5–2 hours depending on roast size. Finish with a high-heat sear for crust. Wood options to consider:
- Oak — traditional for Santa Maria style
- Hickory — bold, assertive smoke
- Cherry — mild, slightly sweet finish
Oven Roasting
The oven is the practical fallback for weeknight cooks or bad weather. Results are tender and juicy — just don't expect the smoky, charred crust that grilling creates.
Sear the tri-tip in a cast iron skillet over high heat on all sides, then transfer to a 250°F oven on a rack. Roast until the internal temperature hits your target doneness (roughly 30–45 minutes for a 2 lb roast). Rest and slice the same way as grilled.
Reverse Sear (Dedicated Method)
The reverse sear is the most precise method for achieving edge-to-edge even doneness with a thick crust — particularly useful for thicker roasts or when cooking for guests where consistency matters.
The trade-off is time. It requires close temperature monitoring throughout and runs longer than traditional methods. That said, the margin for error is wider, and the results are consistently more even than a rushed sear-first approach.
Conclusion
Grilling tri-tip delivers outstanding results when the setup is right. Two-zone heat, a reliable thermometer, proper rest time, and attention to the grain are the four non-negotiables that separate success from disappointment.
The quality of your raw cut is the foundation. A well-marbled, 14-day dry-aged tri-tip — like what 7 Brown Farms cuts from their single-estate Missouri Black Angus herd — does more of the work for you on the grill. Better marbling means more forgiving heat and noticeably richer flavor in the finished cut.
Apply these techniques consistently, then experiment: try a coffee-chili rub, a red wine mop, or a low-and-slow smoke finish once the fundamentals feel solid. Tri-tip rewards repetition — each cook gets you closer to dialing it in perfectly.
Frequently Asked Questions
Is tri-tip steak good for the barbecue?
Yes, tri-tip is an excellent barbecue cut. Its marbling, manageable size, and rich beefy flavor make it well-suited for the grill. It cooks faster than brisket or ribs while delivering comparable depth of flavor when handled correctly with two-zone heat and proper temperature control.
Is sirloin tri-tip good for grilling?
Tri-tip is a bottom sirloin cut and one of the best-value grilling options in that primal. It carries more flavor than top sirloin steaks and, sliced properly against the grain, is far more tender than its lean profile suggests.
Can you smoke tri-tip, and how long does it take?
Yes, tri-tip smokes exceptionally well at 225–250°F and typically reaches target internal temperature in 1.5–2 hours. Many pitmasters finish it with a high-heat sear to develop a proper crust. Oak wood is the traditional choice rooted in California Santa Maria BBQ culture.
Do you sear tri-tip before or after indirect heat?
Starting with indirect heat and finishing with a sear — the reverse sear method — is the preferred approach for roast-size tri-tip. It gives you precise control over doneness; searing first risks an overcooked crust before the interior hits target temperature.
How do you slice tri-tip steak properly?
Tri-tip has a dual-grain structure, so divide the roast at the point where the grain changes direction and slice each section thinly across its own grain. Cutting with the grain — regardless of how well it was cooked — produces tough, chewy bites.
How long should you rest tri-tip before slicing?
Rest tri-tip for 10–15 minutes on a cutting board for a 2–3 lb roast. This allows muscle fibers to relax and reabsorb juices, keeping each slice moist rather than losing those juices to the board when cut too early.