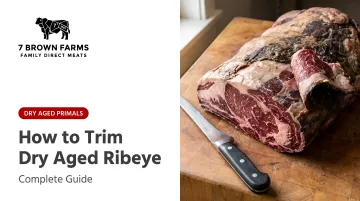
Introduction
Dry-aged ribeye earns its premium price through deep marbling and concentrated beef flavor—but that quality lives just beneath the surface. Trim too aggressively and you waste expensive meat. Trim too lightly and the pellicle (the dried outer crust formed during aging) contaminates every bite. Getting it right means knowing exactly where to cut and why.
Real-world results vary more than most videos suggest. The key variables are:
- Aging duration — a 14-day primal trims differently than one aged 45 or 60 days
- Fat cap condition — thickness and oxidation determine how much to remove
- Knife selection — the spinalis cap needs a boning knife; the main eye and bone require different tools
- Cut location — where you're working on the primal changes the approach
The spinalis (ribeye cap) demands the most careful hand. One wrong pass and you've cut into the most prized muscle on the primal.
This guide walks through tools, technique, and the mistakes that turn premium beef into trim scraps. The process applies to any bone-in ribeye primal—including 7 Brown Farms' 45-day dry-aged Black Angus, which holds shrink loss under 15% and gives you more usable meat to work with from the start.
Key Takeaways
- Trimming a dry-aged ribeye means removing the pellicle—the dried, dark crust formed during aging—to reveal bright red meat beneath
- Start with a bone-in primal with the fat cap intact—it protects the spinalis and cuts trimming waste
- Use a boning knife around bones and a cimitar for flat surface passes
- Trim in thin, shallow passes and stop as soon as you see bright red meat and clean white fat
- Never discard trimmings—pellicle and fat can be rendered into tallow or used for stocks
What You Need Before You Start Trimming
The quality of your starting primal and your toolkit together determine how cleanly the trim goes. A dull knife or an improperly aged cut makes this job harder, wastes more meat, and increases the risk of injury.
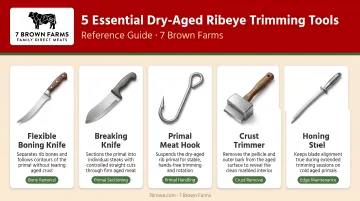
Tools Required
Gather these five items before you make the first cut:
- Boning knife (5–6.5 inches, flexible blade) — maneuvers around bones and curved surfaces like the spinalis without tearing meat beneath the pellicle
- Cimitar or chef's knife (8–14 inches) — the curved blade lets you make long, smooth slicing passes across flat surfaces; no sawing required, which preserves texture
- Hacksaw — use for any remaining chine bone work; produces less bone dust (kerf loss) than a band saw, so you lose less usable meat
- Cut-resistant glove — FSIS requires these for professional red meat processing; home trimmers should follow the same standard and wear it on the non-knife hand
- Large cutting board — place a damp towel underneath to prevent slipping during close pellicle work
Starting Conditions
Two conditions directly affect how the trim goes:
- Fat cap intact — Start with IMPS 109A format (fat cap on, chine mostly removed). External fat limits moisture loss during aging, which means less pellicle to remove and better overall yield. Well-managed primals — like 7 Brown Farms' Black Angus cuts aged in Stagionello cabinets — hold shrink loss under 15%, well below the industry range of 20–50%.
- Temperature — Let the primal rest uncovered for 15–20 minutes before you start. Extremely cold meat dulls your sense of where the pellicle ends and fresh meat begins, which increases the risk of cutting too deep.
How to Trim a Dry-Aged Ribeye: Step-by-Step
Step 1: Assess the Primal
Examine the full surface before cutting anything. Identify:
- Fat cap side (protects the spinalis)
- Bone side (rib bones visible)
- Two exposed cut-face ends (the surfaces exposed to air during aging)
The cut faces show the most desiccation and typically require the deepest passes—sometimes up to 1 cm of removal. Look for the color gradient: the outer pellicle will be dark brown to near-black, while the interior meat will be bright red with visible marbling once you reach it.
Step 2: Peel Back the Fat Cap
Begin by peeling off the outer fat cap using your hands and a boning knife—grip slippery sections with a clean kitchen towel. Work slowly, pulling the fat away in connected sections. Don't discard it yet; the fat cap shows you how deep the desiccation runs underneath.
The fat underneath the dried outer layer is often perfectly usable for tallow rendering or flavor additions.
Step 3: Trim the Pellicle in Thin, Shallow Passes
Hold the knife nearly flat against the surface and work in thin slices, removing just the dried outer layer at a time. The pellicle (or crust) is the dehydrated surface layer that forms due to moisture evaporation and must be removed because it's hard, dry, and can add off-flavors.
Pay closest attention to the spinalis muscle—the outer cap running along the top of the ribeye. It's the most flavorful section and the most vulnerable to over-trimming, so use a sharp boning knife for precise control.
Continue trimming the sides and the meaty face using the same shallow-pass technique. Stop trimming each area as soon as the color shifts from dark/gray to bright red.
Step 4: Address the Bone Areas and Cut Faces
Trim around the rib bones using the boning knife's flexible blade to follow the bone's curve without lifting attached meat. If the chine bone is still partially attached, remove it cleanly with a hacksaw before finishing this step.
The two cut-face ends require the deepest removal—typically 0.5 to 1 cm—because these surfaces had no fat cap or bone protection during aging. Trim until only fresh meat is visible.
Step 5: Final Check and Clean-Up
Inspect the entire trimmed surface for any remaining pellicle patches, silverskin, or grayish meat. Use the tip of the boning knife to remove small remaining spots without taking broad sweeping cuts.
The finished primal should show consistent bright red meat and clean, white-to-cream fat across its entire surface.
Step 6: Slice Individual Ribeye Steaks
Using the cimitar or chef's knife, slice steaks by cutting between the rib bones (for bone-in ribeyes) or in uniform thickness (for boneless). Aim for 1.25 to 1.5 inches thick—thinner cuts risk overcooking the interior before developing a proper crust given the concentrated nature of dry-aged beef.
Two trimming approaches exist:
- Trim the entire primal and portion all steaks at once (then vacuum seal and freeze extras)
- Trim and cut one or two steaks at a time, returning the remaining primal to age further
The second method allows for customized aging depth per steak, giving you variety in flavor intensity from the same primal.
Key Variables That Affect How Much You Trim
The outcome of trimming—how much usable meat you retain versus discard—is directly controlled by variables that experienced butchers manage from the moment the primal goes into the aging environment.
Aging Duration
The longer the ribeye has been aged, the thicker the pellicle. A 14-day aged primal shows 3.31% to 4.74% cooler shrinkage, while a 21-day primal increases to 4.54% to 6.53% cooler shrinkage with 5.06% to 6.55% trim loss. At 28 days, trim loss on exposed cuts can exceed 34%.
Total edible yield does not decrease proportionally with longer aging, though. The outer layer becomes increasingly impermeable to moisture loss after the first few weeks. The internal meat stays protected by the pellicle, which functions like a rind on aged cheese.
Fat Cap and Bone Integrity
Two structural elements on the primal determine how much edible meat survives the aging process:
- Fat cap (109A format): Keeps the spinalis fully protected throughout aging. The fat is removed at trimming time, and the meat underneath is fully edible. A primal aged without its fat cap (109 Export) loses the outer layer of the spinalis to desiccation — the most flavorful muscle on the cut.
- Bone: Bone-in loins show significantly less weight loss and higher saleable yield compared to boneless cuts. The bone acts as a physical barrier that limits exposed surface area and slows moisture evaporation.
Knife Sharpness
A dull knife forces you to apply pressure and saw, which increases the risk of tearing through the fresh meat beneath the pellicle rather than peeling the crust cleanly. Sharpening and honing the boning knife before starting is non-negotiable.
A properly sharpened boning knife lets you follow the pellicle contour precisely, removing only what's inedible and preserving every usable millimeter of aged beef beneath it.
Ribeye Cut Type and Primal Format
The format of the ribeye primal determines how protected the meat is going in and how complex the trimming will be coming out:
- IMPS 107: Short plate removed 3.0 to 4.0 inches from the eye; chine and blade bone removed but feather bones remain
- IMPS 109A: Feather bones removed; fat cover trimmed to 1.0 inch and repositioned over the spinalis and eye
- IMPS 109D (Export Style): Fat cover completely removed; short plate removed 2.0 to 3.0 inches from the eye

109A offers the best protection and lowest trim waste. 109D exposes the spinalis directly to the aging environment, forcing the pellicle to form on edible meat and requiring deeper trimming.
Common Mistakes When Trimming a Dry-Aged Ribeye
Most trimming errors come down to impatience — moving too fast, skipping prep steps, or treating every part of the primal the same way. Avoid these four:
Trimming too aggressively in a single pass: One deep slice through dark exterior removes perfectly edible aged meat beneath the pellicle. Work in shallow, iterative passes and reassess after each one.
Neglecting the spinalis: The cap has a different fat structure and surface contour than the main eye — it demands slower, more deliberate work with a boning knife. Rushing here is the most expensive mistake you can make on a premium cut.
Skipping the cut-resistant glove near bone: A boning knife can slip on bone or wet fat without warning. Wear a cut-resistant glove and never force the blade — let the edge do the work.
Trimming a refrigerator-cold primal: Cold meat makes it nearly impossible to read the color shift between pellicle and fresh meat. Pull the primal out 20–30 minutes before trimming so the surface warms slightly and the transition becomes visible.
What to Do with Your Dry-Aged Ribeye Trimmings
The pellicle and fat trimmings from a properly aged ribeye are packed with concentrated flavor. Don't discard them — both have practical uses worth knowing.
Render into Tallow
The fat cap and pellicle render down into beef tallow useful for cooking other proteins, sautéing vegetables, or seasoning cast iron. The dry-aged crust contains concentrated free amino acids and unique microbial catabolites that enhance beefy, roasted, and umami flavor profiles.
When aging is done correctly with no harmful mold present, the rendered tallow carries the distinctive nuttiness of the aged beef.
Ground Meat and Stocks
Ground trimmings — the leaner edge meat, not the pellicle itself — mix well into burger blends or serve as the base for a rich dry-aged beef stock. Added to soups, stews, or braises, they bring a depth of flavor that standard ground beef simply can't match.
Conclusion
Good trimming starts before the knife touches the primal. Source a fat-cap-intact cut, age to the right duration, and have a sharp boning knife ready — those choices determine how much usable beef you keep.
The most common source of wasted money is aggressive over-trimming. The pellicle is thin relative to the primal's total volume, and shallow passes preserve far more than most people expect. With a bone-in 109A primal aged properly, you should retain the vast majority of the original weight as usable, premium beef.
If you'd rather skip the trimming process entirely, 7 Brown Farms ships pre-trimmed, individually packaged ribeye steaks — 14-day dry-aged, 100% Missouri Black Angus, and ready to cook straight from the package.
For steakhouses or serious home butchers, their 45-day dry-aged primal service is also available. Contact Farmer Brown directly at 314-540-5515 to discuss custom cut sheets and primal orders.
Frequently Asked Questions
Should you trim a dry-aged ribeye?
Yes, trimming is required. The outer pellicle that forms during aging is too tough and leathery to cook or eat and must be removed before the steak can be cooked or portioned.
Does dry-aging beef increase histamine?
Inner meat histamine levels stay low when aging is done correctly. Controlled environments at 0–4°C with precise humidity and airflow prevent undesirable accumulation, and the pellicle — which is trimmed away — is where most microbial activity concentrates.
How much of the pellicle should you remove?
Remove the pellicle until bright red meat and clean white fat are visible—typically a few millimeters on protected surfaces and up to 1 cm on exposed cut faces. Stop as soon as the color transition is complete.
Can you eat the dry-aged rind or pellicle?
Not directly — the pellicle is too tough and intensely flavored for most palates. That said, it can be rendered, used in stocks, or ground into burger meat if the aging environment was clean and mold-free.
How thick should you cut dry-aged ribeye steaks?
Cut dry-aged ribeye steaks 1.25 to 1.5 inches thick. The concentrated nature of dry-aged beef means thinner cuts overcook quickly and lose the advantage of the aging process before developing a proper crust.
What is the expected yield loss when trimming a dry-aged ribeye?
A well-aged, fat-cap-intact ribeye primal typically loses only the pellicle from cut-face ends. With controlled aging, total edible yield stays close to that of a fresh primal. The dramatic 30% loss figure commonly cited applies to unprotected or improperly aged cuts, not well-managed dry aging.