Introduction
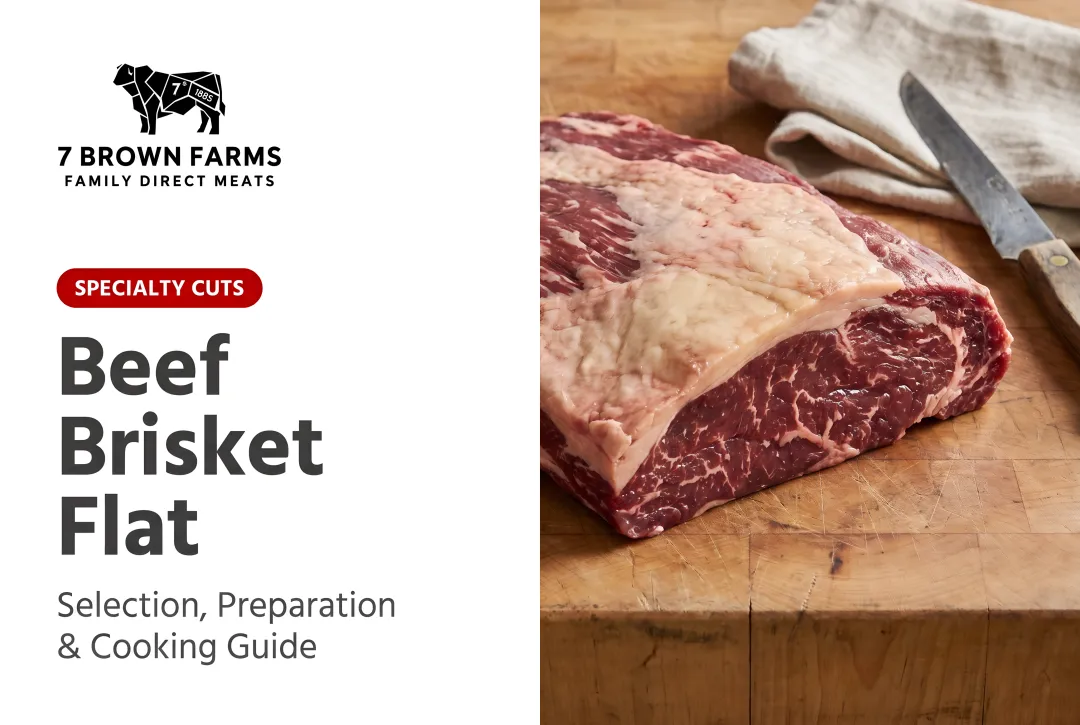
Brisket is one of the most rewarding and most unforgiving pieces of meat in the BBQ canon. Cut from the heavily worked pectoral muscle of the cow, this tough, collagen-dense slab demands low-and-slow smoking to transform into rich, melt-in-your-mouth beef. Get it right, and you'll earn legendary status at the next family cookout. Get it wrong, and you've wasted 15 hours and a $100 piece of meat.
The gap between dry, crumbly disappointment and silky, smoke-kissed perfection comes down to decisions made long before your smoker hits 225°F. How you select, trim, season, and monitor your brisket determines whether you'll slice into tender, juicy beef or salvage burnt ends from a disaster.
Research published in Meat and Muscle Biology traces brisket's unforgiving nature to the anatomical differences between its two muscles: the leaner flat and the fattier point carry drastically different fat and collagen levels, meaning they cook at different rates and require different protection strategies.
Every preparation stage matters: grade selection, trim technique, seasoning, wrap method, and rest period. Get each one right, and competition-quality smoked brisket at home stops being a gamble.
Key Takeaways
- Choose a whole packer brisket graded USDA Choice or Prime for maximum marbling and moisture insurance
- Trim fat cap to ¼ inch, remove silverskin, and dry brine overnight for superior bark formation
- Smoke uncovered at 225°F to 165°F internal, wrap in butcher paper, finish to 202–203°F probe-tender
- Rest wrapped for at least 1–2 hours before slicing to lock in juices and preserve texture
- Slice against the grain—rotate the point 90 degrees before slicing, as its grain runs perpendicular to the flat
Choosing the Right Brisket for Smoking
Understanding Brisket Anatomy: Flat, Point, and Whole Packer
A whole packer brisket includes both the flat (pectoralis profundus, leaner) and the point (pectoralis superficialis, fattier). Data from Texas A&M Meat Science shows the point contains 12.1% fat versus the flat's 6.3%, and nearly double the collagen (11.05 mg/g versus 5.95 mg/g). This makes the point far more forgiving during long cooks, while the lean flat is highly susceptible to drying out.
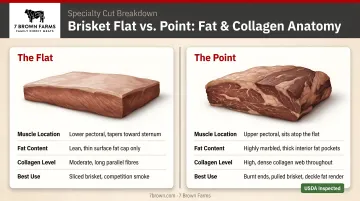
Buying a whole packer is the best option for smoking because the point's fat content helps insulate and baste the flat throughout the cook. Flat-only cuts lack this built-in moisture buffer and require obsessive temperature management to avoid turning into beef jerky.
USDA Grades: Why Marbling Determines Success
USDA quality grades are defined by intramuscular fat (marbling) visible in the ribeye muscle. According to USDA standards:
- Prime: At least "slightly abundant" marbling
- Choice: At least "small" marbling
- Select: At least "slight" marbling
Higher marbling directly correlates with moisture retention during low-and-slow cooking. A 2020 study in Meat and Muscle Biology found that Prime and upper-Choice briskets retained significantly more moisture and produced superior tenderness scores compared to Select-grade cuts. As of December 2024, USDA grading reports show that 11.33% of beef grades as Prime and 72.31% as Choice, meaning most retail briskets will be Choice grade.
Recommendation: Avoid Select grade for smoking. The low fat content offers no buffer against the inevitable moisture loss during 12+ hour cooks.
What to Look for When Inspecting a Raw Brisket
- Even thickness across the flat: Thin, tapered flats dry out before the point finishes
- Visible intramuscular marbling: White flecks throughout the lean meat, not just surface fat
- Pliable fat cap: Soft, white fat that bends easily—stiff, yellow fat indicates age or poor handling
- Avoid warning signs: Pale color, excessive hardness, or overly thin flats
Those inspection criteria matter most when you can't verify where the brisket came from — which brings sourcing into the picture.
Sourcing Considerations: Farm-Direct vs. Mixed-Origin Grocery Cuts
Grocery store briskets often come from mixed-origin supply chains where cattle from multiple farms, feed programs, and genetics are blended during processing. This creates inconsistency in marbling, flavor, and cook performance — two briskets from the same store shelf can cook completely differently.
Single-source beef eliminates that guesswork. When evaluating farm-direct options, look for:
- Single-estate origin: One farm, one breed, documented traceability
- Breed consistency: American Black Angus and similar heritage breeds are bred for intramuscular fat development
- No hormone or antibiotic use: These affect fat composition and flavor
- Dry aging: Minimum 14 days breaks down connective tissue and concentrates flavor before the brisket even hits the smoker
7 Brown Farms raises 100% American Black Angus on a single Missouri Ozarks estate — USDA inspected, 14-day minimum dry-aged, and finished on a custom grain program designed to develop intramuscular fat. That kind of documented consistency means your marbling baseline is already established before you light the smoker.
How to Prepare and Smoke a Brisket: Step-by-Step
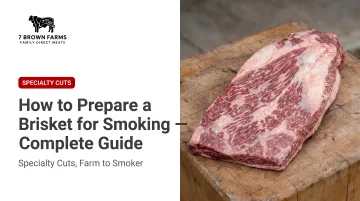
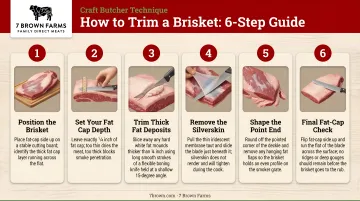
Step 1: Trim the Brisket
Keep it cold. Cold fat is firm and cuts cleanly; room-temperature fat turns slippery and dangerous. Place the brisket fat-cap up on a large cutting board and use a sharp boning or slicing knife.
Trim the fat cap to ¼ inch: This is the industry consensus. Thicker fat won't render completely and leaves a greasy, unpalatable layer. Thinner fat exposes the meat to excessive heat and drying. A ¼-inch cap protects the flat while allowing smoke and rub to penetrate and form bark.
Remove silverskin: The tough, shiny membrane (epimysium) on the lean side is elastin-based connective tissue that will not break down during cooking. Slide your knife under it and peel it off in strips.
Cut away hard fat pockets: Where the flat meets the point, you'll find dense, waxy fat that won't render. Trim it out.
Square off thin edges: Any flaps thinner than a pencil will burn or dry out. Trim them clean.
Mark the grain: Cut a small notch in one corner of the point to mark grain direction for slicing later.
Step 2: Apply a Binder and Season
Binders: Yellow mustard, Worcestershire sauce, or olive oil help the rub stick and promote bark formation. The mustard flavor cooks off entirely — no tang transfers to the meat.
Classic Texas-Style Rub (Dalmatian Rub):
- Coarse kosher salt
- Coarse black pepper
- Optional: garlic powder
Mix at a 50/50 salt-to-pepper ratio by volume. Coarse grind is non-negotiable — fine table salt penetrates too aggressively, drawing moisture out too fast and creating uneven saltiness.
Coarse kosher salt creates a tacky surface that anchors the rub and develops into a proper bark crust.
Dry Brine Overnight: After seasoning, place the brisket uncovered in the refrigerator for 12–16 hours minimum — up to 72 hours for best results. Salt draws moisture to the surface via osmosis, then the brine reabsorbs back into the meat, improving moisture retention and bark development.
Step 3: Smoke the Brisket — First Stage (Uncovered)
Preheat to 225°F using indirect heat. Add hardwood:
- Oak or post oak: Texas standard — bold, clean, complementary to beef
- Hickory: Stronger; use sparingly or risk bitterness
- Pecan: Similar to hickory but slightly sweeter
- Apple or cherry: Subtle sweetness; milder smoke profile
The smoke ring — the pink band caused by nitric oxide and carbon monoxide binding to myoglobin — only forms before the meat hits 140–170°F internal. Surface moisture enhances smoke absorption, so the early unwrapped stage is where wood choice matters most.
Orientation:
- Fat side up if using indirect heat (rendering fat bastes the meat)
- Fat side down if heat comes from below (protects the flat from direct heat)
- Point toward the heat source since it's thicker and more forgiving
Smoke uncovered until 165°F internal. Insert a probe thermometer into the thickest part of the flat. Resist opening the smoker — every lift releases heat and disrupts the smoke environment. Estimate 1 hour per pound at 225°F for this stage, but rely on temperature, not time.
Step 4: Wrap, Finish, Rest, and Slice
When to Wrap: At 165°F internal, the brisket should have a dark, firm bark. This is when evaporative cooling (the "stall") begins to plateau the temperature for hours.
Wrap in unwaxed butcher paper (preferred over foil). Butcher paper is breathable, preserving bark crispness while trapping enough moisture to push through the stall. Optionally, drizzle rendered beef tallow over the brisket before sealing for added moisture and beef flavor.
Finish the cook: Return the wrapped brisket seam-side down to the smoker at 225°F (or increase to 250–275°F to speed up the finish). Continue until internal temperature reaches 202–203°F and the probe slides in with zero resistance — no tug, no drag, just clean penetration through the meat.
Rest for 1–2 hours minimum: Place the wrapped brisket in an insulated cooler (a "faux Cambro") or warming oven at 150–170°F. Resting allows muscle fibers to relax and reabsorb juices. Testing has shown that even 10 minutes of rest can reduce juice loss by over 60%. For brisket, 2–4 hours is ideal; longer is better.
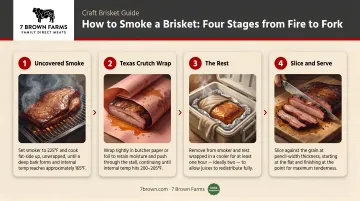
Slice across the grain: Unwrap, identify the grain direction on both the flat and the point, and slice perpendicular at approximately pencil-width thickness. Rotate the point 90 degrees before slicing — its grain runs perpendicular to the flat.
Key Variables That Determine Brisket Results
Two cooks following the same recipe can get drastically different results because brisket is sensitive to a handful of interacting variables. Understanding them lets you diagnose problems and adjust in real time.
Smoking Temperature: 225°F vs. 275°F
Temperature controls how fast collagen converts to gelatin. Collagen begins melting at 160°F and accelerates through 180°F, but time and temperature work together—neither alone is enough. Too high, and the meat tightens and dries before fat renders fully. Too low, and the cook stalls indefinitely.
| Pit Temp | Total Cook Time | Smoke Exposure | Bark & Texture Outcomes |
|---|---|---|---|
| 225°F | 12–18 hours | Maximum | Excellent bark; highly forgiving collagen breakdown |
| 275°F | 10–12 hours | Less total time | Great bark; requires closer monitoring to prevent drying |
Aaron Franklin typically smokes at 255–275°F. Many pitmasters compromise by starting at 225°F during the unwrapped first stage (maximum smoke absorption) and increasing to 250–275°F after wrapping to finish more efficiently.
Wood Type and Smoke Intensity
Wood determines the smoke flavor profile and penetration. Over-smoking or using the wrong wood creates a bitter, acrid crust that overpowers the beef.
- Post oak: Mild, sweet smoke; the Central Texas standard; builds bark without overpowering
- Hickory: Strong, bacon-like, spicy flavor; can dominate if used exclusively
- Fruit woods (apple, cherry): Subtle sweetness
- Softwoods (pine, fir): Resinous, acrid—avoid entirely
Smoke absorption is highest during the first unwrapped stage, which is why wood choice matters most before the wrap.
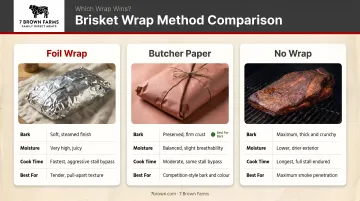
The Wrap Method: Butcher Paper vs. Foil vs. No Wrap
The wrap decision directly affects bark texture, moisture level, and cook time—one of the most debated variables among competition pitmasters.
| Wrap Method | Cook Time Impact | Bark Texture | Moisture Retention |
|---|---|---|---|
| Aluminum Foil (Texas Crutch) | Fastest (powers through stall) | Soft/steamed; can become mushy | Highest (braises meat) |
| Pink Butcher Paper | Moderate speed increase | Preserves dark, caramelized bark | Moderate; allows some steam escape |
| No Wrap | Slowest (full stall duration) | Firmest, thickest bark | Lowest; highest risk of drying out |
Butcher paper offers the best balance for home cooks. Foil is faster but sacrifices bark. No wrap maximizes bark but requires patience and risks drying out the flat—best suited for experienced cooks with precise heat control.
The Rest Period: Why It's Non-Negotiable
Muscle fibers contract sharply during cooking, squeezing moisture toward the center. Resting allows them to relax and reabsorb those juices. Slice too early and the moisture spills onto the cutting board, leaving dry, chalky meat.
- Minimum 1 hour: Baseline; produces acceptable results
- 2–4 hours in an insulated cooler: Preferred by most pitmasters; produces noticeably more tender, juicy results
- Carryover cooking: Holding at 150–170°F finishes melting collagen and allows gelatin to thicken slightly, redistributing moisture
Skipping the rest is the most common mistake first-time brisket smokers make—and it destroys the texture no matter how well the cook went.
Common Mistakes When Preparing a Brisket for Smoking
Most brisket prep mistakes are avoidable — they just require knowing what to watch for before the cook begins.
Fat cap thickness: Leaving more than ¼ inch creates a thick, greasy layer that won't render and blocks the rub from reaching the meat. Over-trimming is equally problematic — it strips the protective fat needed for a long cook.
Fine-ground salt: Table salt penetrates too quickly, causing uneven saltiness and weak bark formation. Use coarse kosher salt instead — it draws out just enough moisture to create a tacky surface the rub can grip.
Lifting the lid too often: Every peek releases heat and disrupts thin blue smoke. Use a probe thermometer and commit to minimal interference for the first 6–8 hours.
Skipping the rest: Slicing immediately destroys juice retention. Muscle fibers need 1–2 hours to relax and reabsorb moisture — once cut, exposed edges dry out fast.
Trusting the clock over the probe: A brisket is done when a thermometer slides in with zero resistance around 202–203°F, not when a timer goes off. The probe tells you what the clock never can.
Conclusion
A great smoked brisket is the product of compounding good decisions: selecting a well-marbled whole packer brisket (quality of the raw cut is the single most controllable input), executing a clean trim, seasoning properly, and respecting the two-stage smoke and rest process.
Starting with a cut that has consistent intramuscular fat built in — like 7 Brown Farms' single-estate Black Angus brisket, 14-day dry-aged and custom grain-finished in the Missouri Ozarks — gives home pitmasters an immediate advantage before the smoker is even lit. Better marbling means more forgiving cook windows and richer flavor in every slice.
Most brisket failures trace back to one of three root causes: poor preparation (skipping trim or dry brine), parameter errors (wrong temperature, opening the smoker, or not using a probe), or impatience (slicing without resting). Master these three areas, and consistently excellent smoked brisket becomes achievable for any home cook.
Frequently Asked Questions
How do you prepare a brisket before smoking?
Trim the fat cap to ¼ inch and remove silverskin, apply a binder (mustard or oil), coat with a coarse salt-and-pepper rub, and dry brine uncovered in the refrigerator for at least 4 hours (ideally overnight) before placing on the smoker.
How do you keep a brisket moist when smoking?
Three things keep brisket moist: not over-trimming fat, wrapping in butcher paper at 165°F to push through the stall, and resting at least 1–2 hours before slicing so juices redistribute.
How long do you smoke a brisket at 225°F?
At 225°F, plan on approximately 1 hour per pound total. A 12–14 pound whole packer brisket typically takes 12–18 hours from start to finish, including an 8-hour first stage to 165°F, a 4–8 hour wrapped second stage to 202–203°F, and a 1–2 hour rest.
Is it better to smoke brisket at 275°F or 225°F?
225°F produces maximum smoke absorption and the most tender result, while 275°F shortens total cook time by roughly 25–30% with minimal quality trade-off. A practical approach: start at 225°F unwrapped, then increase to 250–275°F after wrapping to finish more efficiently.
Should you smoke a brisket fat side up or fat side down?
Fat side up works best with indirect heat setups (the rendering fat bastes the meat), while fat side down is preferred when heat comes from directly below (the fat layer acts as a buffer). In practice, the difference is minimal — focus on heat source position and consistent temperature over fat orientation.
What is beef brisket best used for?
Smoked brisket shines as a Texas BBQ centerpiece — sliced and served with pickles and white bread. Leftovers work well in tacos, sandwiches, chili, and hash, while the fatty point is the go-to cut for burnt ends.